Pages

Showing posts with label Linux. Show all posts

May 23, 2011

Linux:Building Kernel and installation process Part 2

Now lets see a breakdown of my earlier post 
http://subramanyaachar.blogspot.com/2011/05/linuxbuilding-kernel-and-installation.html
Lets download a linux package .
Get latest package from www.kernel.org
http://www.kernel.org/pub/linux/kernel/v2.6/linux-2.6.39.tar.gz  [ or bz2]
In linux use 

  1. wget http://www.kernel.org/pub/linux/kernel/v2.6/linux-2.6.39.tar.gz
  2. tar zxvf linux-2.6.39.tar.gz 

Once its unzipped u will get a directory linux-2.6.39 [or linux-2.x.x]
cd linux-2.6.39


If you already have a customized options for configuring your kernel use make oldconfig else use make menuconfig and select the required configuration.You can also use a graphical version make xconfig. [basically for wireless config,Networking....]
View of make menuconfig


After you have generated your .config file .
Tip
If something went wrong in .config
make mrproper -will delete the .config file


Its time proceed to dependencies
make dep 
Note: make dep just ensures whether all include files and other dependencies are in place
Tip
make clean-This removes all of the object files and some other things that an old version leaves behind.See this always help you when you are recompiling your kernel.


What we did till now ?
Downloaded the kernel ,made the required configuration which generated .config file later did make dep .


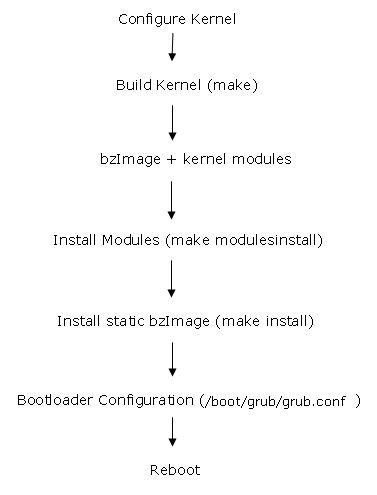
Major Part -Compiling Kernel
make bzImage
resulting kernel image will be in "arch/i386/boot/bzImage"


Lets proceed to building Modules
Remember just to compile a module you dont require the entire linux source tree.
Okie here we are worried about Linux Kernel building ...
So to build modules you can use make modules
make modules_install will copy the modules into the the kernel directory of lib.


Okie till now everything seems to be good.Lets Install the kernel now.
We have seen in my earlier post 
http://subramanyaachar.blogspot.com/2011/05/linuxboot-process.html
Kernel Image is termed as vmlinuz

image=/vmlinuz # Location of kernel.
Is it wrong?We have generated kernel here and its called "bzImage".Who kept vmlinuz now ??
Okie here is the answer

On most Linux systems, the kernels are stored in the /boot directory.So after generating the kernel bzImage we will copy it .

cp arch/i386/boot/bzImage /boot/vmlinuz-2.6.39
Why as vmlinuz??
Its the usual convention followed .Check your bootloader config.While copying keep you can keep your name but accordingly change the configuration you are all set.
Releaved!!
So after you have copied the newly genereated bzImage as vmlinuz-2.6.39 copy the System.map as well in the /boot directory .[/boot/System.map]
System.map is generally used by syslogd and klogd for kernel logging
Further Reading
http://linuxmafia.com/faq/Kernel/systemmap.html


change the bootloader configuration file [LILO/GRUB] with the new name vmlinuz-2.6.39.
You are all set .


Kernel Get set Go!!!!!!!


May 18, 2011

Linux:Play with your PS1

Confused?
Well lets see
PS1 is primary prompt string used in bash Viz.,
[name@mylinux name]$
How can i see its setting in my bash ?

[name@mylinux :~] $echo $PS1
Output:[\u@\h:\w] $
How can it be customized?
Bash allows customization of PS1 by inserting the backslash which are provided.Following are the list 

  • \a : an ASCII bell character (07)
  • \d : the date in "Weekday Month Date" format (e.g., "Tue May 26")
  • \D{format} : the format is passed to strftime(3) and the result is inserted into the prompt string; an empty format results in a locale-specific time representation. The braces are required
  • \e : an ASCII escape character (033)
  • \h : the hostname up to the first '.'
  • \H : the hostname
  • \j : the number of jobs currently managed by the shell
  • \l : the basename of the shell’s terminal device name
  • \n : newline
  • \r : carriage return
  • \s : the name of the shell, the basename of $0 (the portion following the final slash)
  • \t : the current time in 24-hour HH:MM:SS format
  • \T : the current time in 12-hour HH:MM:SS format
  • \@ : the current time in 12-hour am/pm format
  • \A : the current time in 24-hour HH:MM format
  • \u : the username of the current user
  • \v : the version of bash (e.g., 2.00)
  • \V : the release of bash, version + patch level (e.g., 2.00.0)
  • \w : the current working directory, with $HOME abbreviated with a tilde
  • \W : the basename of the current working directory, with $HOME abbreviated with a tilde
  • \! : the history number of this command
  • \# : the command number of this command
  • \$ : if the effective UID is 0, a #, otherwise a $
  • \nnn : the character corresponding to the octal number nnn
  • \\ : a backslash
  • \[ : begin a sequence of non-printing characters, which could be used to embed a terminal control sequence into the prompt
  • \] : end a sequence of non-printing characters

so if i make PS1="\d \h $ " ,output of bash PS1 will be "Wed May 18 server $ "
How to Add colours?
List of color equivalences


Black       0;30     Dark Gray     1;30
Blue        0;34     Light Blue    1;34
Green       0;32     Light Green   1;32
Cyan        0;36     Light Cyan    1;36
Red         0;31     Light Red     1;31
Purple      0;35     Light Purple  1;35
Brown       0;33     Yellow        1;33
Light Gray  0;37     White         1;37
So if you replace 0 with 1 it will become dark color !
Note
Non-printing escape sequences have to be enclosed in \[\033[ and \]. For colour escape sequences, they should also be followed by a lowercase m.
so if you need to make it blue ,PS1 will be appended with \[\033[34m\].Got it !!


PS1="\[\033[34m\][\$(date +%H%M)][\u@\h:\w]$ "
To be continued


May 16, 2011

NTP Vs SNTP

NTP-Network Time Protocol.The Network Time Protocol (NTP) daemon synchronizes the system clock with a remote time server or time source (such as a satellite). 
In simple
NTP is a TCP/IP protocol for synchronising time over a network. Basically a client requests the current time from a server, and uses it to set its own clock.
SNTP-Simple Network Time Protocol
SNTP is less precise to NTP
Why its required ?
NTP and SNTP synchronize the clocks of computers on a network to compensate the latency.
When NTP is needed?
NTP is fault tolerant and highly scalable and is used when a more accurate clock is needed.
While a full featured NTP server or client reaches a very high level of accuracy and avoids abrupt timesteps as much as possible by using different mathematical and statistical methods and smooth clock speed adjustments, SNTP can only be recommended for simple applications, where the requirements for accuracy and reliability are not too demanding.
So which algorithm is used in NTP to make more accurate?
Marzullo's Algorithm
What this algorithm says?

  1. The NTP client asks all of its NTP servers what time it is.
  2. The different servers will give different answers, with different confidence levels because the requests will take different amounts of time to travel from the client to the server and back.
  3. Marzullo's algorithm will find the smallest range of time values consistent with all of the answers provided.
  4. You can be more confident of the accuracy of the answer from this algorithm than of that from any single time servers because the intersection of several sets will likely contain fewer elements than any individual set.
  5. The more servers you query, the more constraints you'll have on the possible answer, and the more accurate your clock will be.

Is it really used in Windows machines?
Check out registry key  HKLM\System\CurrentControlSet\Services\W32Time\Par ameters\Type
How about Linux?
/etc/ntp.conf or  /etc/xntp.conf
Service Handling

service ntpd start
service ntpd stop
service ntpd restart

How can i know which server can i use for NTP?
http://www.pool.ntp.org/en/
Log :
Initial:

[root@smallfry tmp]# date
Thu May12 00:00:00 PDT 2011
Update:

[root@smallfry tmp]# service ntpd stop
[root@smallfry tmp]# ntpdate -u 192.168.1.100
Looking for host 192.168.1.100 and service ntp
host found : bigboy.my-site.com
12 Aug 08:03:38 ntpdate[2472]: step time server 192.168.1.100 offset 28993.084943 sec
[root@smallfry tmp]# ntpdate -u 192.168.1.100
Looking for host 192.168.1.100 and service ntp
host found : bigboy.my-site.com
12 Aug 08:03:40 ntpdate[2472]: step time server 192.168.1.100 offset 2.467652 sec
[root@smallfry tmp]# ntpdate -u 192.168.1.100
Looking for host 192.168.1.100 and service ntp
host found : bigboy.my-site.com
12 Aug 08:03:42 ntpdate[2472]: step time server 192.168.1.100 offset 0.084943 sec
[root@smallfry tmp]# service ntpd start
Final:

[root@smallfry tmp]# date
Thu May12 08:03:45 PDT 2011

Further Reading
NTP
http://www.brennan.id.au/09-Network_Time_Protocol.html
http://www.linuxhomenetworking.com/wiki/index.php/Quick_HOWTO_:_Ch24_:_The_NTP_Server
SNTP
http://www.networksorcery.com/enp/protocol/sntp.htm
http://www.faqs.org/rfcs/rfc2030.html
Executable
http://translate.google.com/translate?hl=en&sl=ja&u=http://www010.upp.so-net.ne.jp/suede/sntpclock.html&ei=nfrTTc2ODafX0QHLsLX7Cw&sa=X&oi=translate&ct=result&resnum=3&ved=0CCsQ7gEwAg&prev=/search%3Fq%3DSNTP%2Binurl:jp%26hl%3Den%26rlz%3D1C1SKPL_enUS422US423%26biw%3D1920%26bih%3D989%26prmd%3Divns
IEEE1588
http://isdl.snu.ac.kr/Korean/doc/GetPDF.pdf

Linux:Schedule a job with crontab

By default Linux will be running cron daemon in the background "ps -ef|grep crond" which is responsible to trigger the cron jobs.crond daemon is initiated by  init - /etc/init.d/crond
Jobs will be triggered with the help of crontab entry in "/etc/crontab".
Commands
To display list of crontab entires use "crontab -l"  in your shell 
To edit the crontab file use "crontab -e" in your shell 
Syntax

*    *    *    *    *  command to be executed
-    -    -    -    -
|    |    |    |    |
|    |    |    |    |
|    |    |    |    +----- day of week (0 - 7) (Sunday=0 or 7)
|    |    |    +---------- month (1 - 12)
|    |    +--------------- day of month (1 - 31)
|    +-------------------- hour (0 - 23)
+------------------------- min (0 - 59)

crontab environment setting

SHELL=/bin/bash
PATH=/sbin:/bin:/usr/sbin:/usr/bin:/usr/global/bin
MAILTO=abc@yyy.com
HOME=/

Eg.,

  1. 30 00 * * Mon,Wed, Fri echo "On Mon,Wed,Fri at 00:30 "
  2. 01 6-23/5 * * *   echo "On all days execute the command at 6:01 11:01 17:01 22:01 [6-23] "
More granularity can be done with the help of "/" 1-59/5 will run in multiples of 5
A look at default /etc/crontab file
 # cat /etc/crontab
SHELL=/bin/bash
PATH=/sbin:/bin:/usr/sbin:/usr/bin
MAILTO=root
HOME=/

# run-parts
01 * * * * root run-parts /etc/cron.hourly
02 4 * * * root run-parts /etc/cron.daily
22 4 * * 0 root run-parts /etc/cron.weekly
42 4 1 * * root run-parts /etc/cron.monthly

root run-parts helps if you need to execute each script in the mentioned directory

Log:
All cron jobs will be logged in /var/log/cron


Linix:Boot Loader GRUB

In my previuos post we have seen about the boot loader LILO
However lets see the initial boot process of LILO
When LILO initially loads, it brings up in order each of the letters -- L-I-L-O. If all the letters come up, the first stage boot was successful. Anything less indicates a problem:

  • L: The first stage boot loader has been loaded. If LILO stops here, there were problems loading the second stage boot loader. This is usually accompanied by an error code. The common problems at this stage are media problems or incorrect disk parameters specified in your lilo.conf file.
  • LI: The second stage boot loader has been loaded. LILO halting at this point indicates the second stage boot loader could not be executed. Again, this can be due to problems similar to just L: loading or if the boot.b file has been corrupted, moved, or deleted.
  • LIL: The second stage boot loader has now been executed. At this point, media problem could again be responsible or the map file (as specified in the lilo.conf file) could have had problems finding the descriptor tables.
  • LIL?: Loaded to the same point as above. This usually means the second stage boot loader loaded at an incorrect address, caused most likely by boot.b being in a different place than specified in the lilo.conf file.
  • LIL-: Loaded to the same point as above. Problem loading the descriptor table, most likely due to a corrupt descriptor table.
  • LILO: LILO has successfully loaded with no errors.
GRand Unified Boot loader (commonly known as GRUB) seems to have somewhat taken the boot loaders crown from LILO.
If you want to migrate to GRUB get the latest version of GRUB and configure it.
GRUB configuration is all done through a configuration file located in /boot/grub/grub.conf.
Snap
default=0 #Which to load by default with reference to index title 
timeout=10
#location of image to be used for background GUI
splashimage=(hd1,2)/grub/splash.xpm.gz password --md5 $1$opeVt0$Y.br.18LyAasRsGdSKLYlp1 title Red Hat Linux password --md5 $1$0peVt0$Y.br.18LyAasRsGdSKLYlp1 root (hd1,2) kernel /vmlinuz-2.4.18-14 ro root=LABEL=/ initrd /initrd-2.4.18-14.img title Windows XP password --md5 $1$0peVt0$Y.br.18LyAasRsGdSKLYlp1 rootnoverify (hd0,0) chainloader +1
As stated at the start of this article, all boot loaders work in a similar way to fulfill a common purpose. But LILO and GRUB do have a number of differences:
  • LILO has no interactive command interface, whereas GRUB does.
  • LILO does not support booting from a network, whereas GRUB does.
  • LILO stores information regarding the location of the operating systems it can to load physically on the MBR. If you change your LILO config file, you have to rewrite the LILO stage one boot loader to the MBR. Compared with GRUB, this is a much more risky option since a misconfigured MBR could leave the system unbootable. With GRUB, if the configuration file is configured incorrectly, it will simply default to the GRUB command-line interface.

Linux:Building Kernel and installation process


When the user types 'make zImage' or 'make bzImage' the resulting bootable kernel image is stored as arch/i386/boot/zImage or arch/i386/boot/bzImage respectively. Here is how the image is built:
  1. C and assembly source files are compiled into ELF relocatable object format (.o) and some of them are grouped logically into archives (.a) using ar(1).To know more about ELF go through http://subramanyaachar.blogspot.com/2011/05/understanding-elf-1.html
  2. Using ld(1), the above .o and .a are linked into vmlinux which is a statically linked, non-stripped ELF 32-bit LSB 80386 executable file.
  3. System.map is produced by nm vmlinux, irrelevant or uninteresting symbols are grepped out.
  4. Enter directory arch/i386/boot.
  5. Bootsector asm code bootsect.S is preprocessed either with or without -D__BIG_KERNEL__, depending on whether the target is bzImage or zImage, into bbootsect.s or bootsect.srespectively.
  6. bbootsect.s is assembled and then converted into 'raw binary' form called bbootsect (or bootsect.s assembled and raw-converted into bootsect for zImage).
  7. Setup code setup.S (setup.S includes video.S) is preprocessed into bsetup.s for bzImage or setup.s for zImage. In the same way as the bootsector code, the difference is marked by -D__BIG_KERNEL__ present for bzImage. The result is then converted into 'raw binary' form called bsetup.
  8. Enter directory arch/i386/boot/compressed and convert /usr/src/linux/vmlinux to $tmppiggy (tmp filename) in raw binary format, removing .note and .comment ELF sections.
  9. gzip -9 < $tmppiggy > $tmppiggy.gz
  10. Link $tmppiggy.gz into ELF relocatable (ld -rpiggy.o.
  11. Compile compression routines head.S and misc.c (still in arch/i386/boot/compressed directory) into ELF objects head.o and misc.o.
  12. Link together head.omisc.o and piggy.o into bvmlinux (or vmlinux for zImage, don't mistake this for /usr/src/linux/vmlinux!). Note the difference between -Ttext 0x1000 used forvmlinux and -Ttext 0x100000 for bvmlinux, i.e. for bzImage compression loader is high-loaded.
  13. Convert bvmlinux to 'raw binary' bvmlinux.out removing .note and .comment ELF sections.
  14. Go back to arch/i386/boot directory and, using the program tools/build, cat together bbootsectbsetup and compressed/bvmlinux.out into bzImage (delete extra 'b' above for zImage). This writes important variables like setup_sects and root_dev at the end of the bootsector.

The size of the bootsector is always 512 bytes. The size of the setup must be greater than 4 sectors but is limited above by about 12K - the rule is:0x4000 bytes >= 512 + setup_sects * 512 + room for stack while running bootsector/setup
We will see later where this limitation comes from.
The upper limit on the bzImage size produced at this step is about 2.5M for booting with LILO and 0xFFFF paragraphs (0xFFFF0 = 1048560 bytes) for booting raw image, e.g. from floppy disk or CD-ROM (El-Torito emulation mode).
Note that while tools/build does validate the size of boot sector, kernel image and lower bound of setup size, it does not check the *upper* bound of said setup size. Therefore it is easy to build a broken kernel by just adding some large ".space" at the end of setup.S.


To Be continued


May 15, 2011

Linux:Startup and run levels Part 2

We have seen the information about the login in the earlier post.Lets move into other aspects now.
Login invokes the shell program at the user's privilege level.One of the things bash will do is to look in the /etc/passwd file to get the name of the user. It will use the UID number to find the username and set the environment variable, USERNAME, to that value.

Files run when bash starts

When bash starts it runs script files in the following order if the files exist and if the shell is a login shell (called by the login program):
  1. The /etc/profile script file.
  2. The .bash_profile script in the user's home directory referred to as $HOME/.bash_profile or ~/.bash_profile. If it is missing $HOME/.bash_login is run. If both .bash_profile and .bash_login are missing $HOME/.profile is run. Only one of these files is run. The one run is the first one of the list found.
    1. $HOME/.bash_profile
    2. $HOME/.bash_login
    3. $HOME/.profile
  3. When bash exits the file called .bash_logout in the user's home directory is run.
I am skipping file systems for now.Lets move to Kernel

The kernel acts as a mediator for your programs and your hardware. First, it performs memory management for all of the running programs, and manages the time slices of the processor's cycles that they get. It provides a portable interface for programs to talk to your hardware.

The kernels main functions:
Device drivers:Interfacing to hardware through device drivers for character, block and network interface devices
Process Management:Controlling processes and the address space they have access to
Allocating time slices for processes
Inter-process communication including process to network card communication
Memory management:Virtual memory addressing control
Filesystem control and structuring
Networking

sysctl is a tool which is used to modify kernel params.
For further information have a look at sysctl -a |more

Linux:Startup and run levels Part 1

Earlier in my post we have seen about Linux Boot process http://subramanyaachar.blogspot.com/2011/05/linuxboot-process.html
Before going further lets see the steps involved in boot up process

  1. The LILO boot loader starts the kernel
  2. The Linux kernel configured by lilo or rdev decompresses and must find and mount the root filesystem. If LILO or the kernel were not configured properly there can be a problem here.
  3. The kernel after loading the root filesystem, starts the "init" program which may be located in /sbin/init. Reads /etc/inittab for configuration information.
  4. /etc/inittab - init reads this file for configuration information. This file determines the starting run level and contains a line like:
    si::sysinit:/etc/rc.d/rc.sysinit
  5. /etc/rc.d/rc.sysinit - In this case this entry in "/etc/inittab" causes the script file "/etc/rc.d/rc.sysinit" to be run.
    To add terminals or dial in modem lines on a system, add more lines in the /etc/inittab file, one for each terminal or dial in line similar to the following:
    7:2345:respawn:/sbin/mingetty tty7
  6. One of /etc/rc.d/rc or /etc/rc or /etc/init.d/rc is started from inittab which does initialization commands for boot at the set runlevel. This is done by running startup and shutdown scripts for various services to be run at the given run level.
  7. /etc/rc.local is started from one of the startup scripts in the rc script file. This is where you should add custom features for your system.
  8. getty - Init starts a separate getty (or mingetty) for each terminal for which logins are to be allowed. Getty is restarted by init after each user has logged out so new users can log in. Network logins are not done by getty but by a different deamon per way of logging in (telnet or rlogin handled by the inetd internet super daemon).
  9. Getty outputs the welcome message in /etc/issue, reads the username and runs the login program. If the user is telnetting, the message in /etc/issue.net is first output.
  10. The login program reads the password and runs the shell if the username and password are correct. The shell is based on entries in the /etc/passwd file and will run at the user's privilege level rather than with root privileges.
  11. The shell (such as bash) runs the /etc/profile script file. However in the case of a system with shadow passwords, environment strings can be set first in a file called /etc/login.defs. Also a users resources can be limited in a file called /etc/limits. The $HOME/.bash_profile script is then run, but if it is missing /etc/.profile is run.
In /etc/rc.d/rc0.d are kill and start scripts for various services. The kill scripts start with the letter "K" and the startup scripts start with the letter "S".
 rc.d scripts can be helpful when it comes to controlling the services to be run on your PC


Lets now dive into  init, getty, login, the shell, startup scripts, and the mounting of file systems.
Init
The init process reads the file "/etc/inittab" and uses this file to determine how to create processes.
Snap of inittab

System initialization.
2) si::sysinit:/etc/rc.d/rc.sysinit 
tells init to run the program "/etc/rc.d/rc.sysinit" during system boot, before any other processes.
This is responsible of running many scripts which in turn starts up many system and network services

Snap of rc.sysinit
  • /etc/sysconfig/network - Controls the initial network configuration. An example file:
    NETWORKING=yes
    FORWARD_IPV4="yes"
    HOSTNAME="mdct-dev3"
    GATEWAY="10.1.0.25"
    GATEWAYDEV="eth0"
    
  • /etc/sysconfig/keyboard - The variable KEYTABLE is defined with a line like:
    KEYTABLE="us"

Since some functions are interdependent on other functions there is some required order in which these scripts must be run in order to bring the system up and to bring it gracefully down. Each runlevel has its own set of start(S) and kill(K) scripts but all these scripts are supported in the directory /etc/rc.d/init.d.
The script file /etc/rc.d/rc is run for the appropriate runlevel (typically 3 or 5) 
Next in the init is to proceed to login 
1:2345:respawn:/sbin/mingetty tty1
this is done by by a program, usually getty or mingetty, 
Steps

  1. The init process spawns the getty process.
  2. The getty process invokes the login process when the user enters their name and passes the user name to login.
  3. The login process prompts the user for a password, checks it, then if there is success, the user's shell is started. On failure the program displays an error message, ends and then init will respawn getty.
  4. The user will run their session and eventually logout. On logout, the shell program exits and we return to step 1.

To be continued...

CPU Affinity


When you are using SMP (Symmetric MultiProcessing) you might want to override the kernel's process scheduling and bind a certain process to a specific CPU(s).

#define _GNU_SOURCE
#include 
long
sched_setaffinity(pid_t pid, unsigned int len,unsigned long *user_mask_ptr);
long
sched_getaffinity(pid_t pid, unsigned int len,unsigned long *user_mask_ptr);
The first system call is used to set the affinity of a process, and the second system call retrieves it.
In either system call, the PID argument is the PID of the process whose mask you wish to set or retrieve. If the PID is set to zero, the PID of the current task is used.
Mask
Bit 0 -> CPU 1, Bit 1 -> CPU 2, Bit 2 -> CPU 3, Bit 3 -> CPU 4  Eg.,0xFFFFFFFF=>All CPUs are available


Eg.,
   pid_t pid;
    unsigned long mask;
    int rc;


    pid = getpid();
    rc = sched_getaffinity(0, sizeof(mask), &mask);
    if (rc == -1) {
        printf("sched_getaffinity() error !!! (%d)\n", errno);
    }
    else {
        printf("mask : 0x%08x\n", mask);
    }


    mask = 0x2;
    rc = sched_setaffinity(0, sizeof(mask), &mask);
    if (rc == -1) {
        printf("sched_setaffinity() error !!! (%d)\n", errno);
    }
    else {
        printf("mask : 0x%08x\n", mask);
    }


    mask = 0x0;
    rc = sched_getaffinity(0, sizeof(mask), &mask);
    if (rc == -1) {
        printf("sched_getaffinity() error !!! (%d)\n", errno);
    }
    else {
        printf("mask : 0x%08x\n", mask);
    }
Further Reading
http://www.linuxjournal.com/article/6799?page=0,0